Sewing ideas
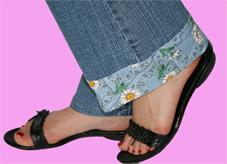
LENGTHENING A PAIR OF TROUSERS
Download
 Lengthening Pair Trousers.pdf
Materials:
- a pair of trousers, jeans etc
- fabric of your choice, which will be used to lengthen the trouser legs
- pins
- thread, ruler, pencil, scissors
Instructions:
- Cut off the existing hem of each trouser leg just above where it has been sewn. If you try to lengthen the trousers leaving the original hem in place, you run the risk of ending up with a fabric thickness that's too difficult to work with, and which may look unattractive.
- Using the ruler, measure the circumference of each trouser bottom, and add 2cm to this measurement to allow for a side seam. Example: the rcumference of my trouser bottom is 48cm, so I add 2cm to get a total measurement of 50cm.
- Choose the length by which you wish to extend your trousers, then double this figure, and once again add 2cm to allow for the seams. Example: I want to lengthen my trousers by 6.5cm, so I double that figure to get 13cm, then add 2cm to get a total measurement of 15cm.
- Cut out two strips of fabric corresponding to the measurements in Steps 2 & 3. According to the examples above, my strips would each measure 50cm x 15cm.

- Thread your sewing machine and select the ‘straight sewing' option.
- Take the fabric strip, and, with the right side of the fabric facing you, bring the two shorter side edges together so that they're lying one on top of the other, and sew together leaving a 2cm seam.

You should end up with a tubular shape with the right side of the fabric inside. Repeat for the second strip of fabric. - With the trousers right-side out, place the tubular strip right up over the end of the trouser leg, so that the bottom edge of the strip is aligned with the bottom edge of the trousers. Line up the side seams on the fabric strip with the side seams of the trousers. Pin or hand-tack the fabric strip into place 1cm from the bottom of the trouser leg.

- Place your machine in ‘free arm' mode, either by removing the accessory holder, or taking off the sewing table.
- Position the bottom of the trouser leg under the free arm and sew the fabric strip into place 1cm from the bottom of the trousers. Sew right around the circumference of the leg, until you get back to where you started. Repeat for the other leg.
- Take the top edge of the fabric strip and pull it downwards, turning it inside out to bring it right-side out. Measure downwards 6.5cm from the new seam, and mark with a pencil.

- Fold the surplus fabric below this mark inside the leg, and iron down flat.

- Secure the new bottom hem using a few pins.
- Position your trouser leg under the free arm, right side up.
- Sew the hem in place right around the circumference of the trouser leg using overstitch, to ensure the stitches are invisible.
Iron the bottom of both trouser legs to smooth and flatten the new seams.


 South Africa
